실행 argument 의 처리
다음 코드를 run_2.py 파일에 저장하고 파이썬에서 실행하여 봅니다.
# 실행코드의 작성 (run_2.py)
import argparse

def parse_option():

    parser = argparse.ArgumentParser('argument for training')
    parser.add_argument('--batch_size', type=int, default=128,
                          help='batch_size')
    parser.add_argument('--optimizer', type=str, default="SGD",
                          help='Optimizer', choices=["SGD", "ADAM", "ADAMW"])
    parser.add_argument('--lr_decay_epochs', type=str, default='10,20,30',
                        help='where to decay lr, can be a list')
    opt = parser.parse_args()

    iterations = opt.lr_decay_epochs.split(',')
    opt.lr_decay_epochs = list([])
    for it in iterations:
        opt.lr_decay_epochs.append(int(it))
    return opt

def main():

    opt = parse_option()
    print("Batch Size:", opt.batch_size)
    print("Optimizer:", opt.optimizer)
    print("Decay Epoch:", opt.lr_decay_epochs)


if __name__ == '__main__':
    main()
main 함수는 opt 에 저장된 값을 출력해주는 간단한 함수입니다. opt에 저장된 값들은 parse_option()의 실행결과로 만들어집니다. parse_option()는 python 을 터미널에서 실행시킬 때, 터미털의 커맨드로 부터 변수를 받을 수 있습니다. 여기서는 --batch_size, --optimizer, --lr_decay_epochs 세 개의 옵션을 받을 수 있습니다. 커맨드 창에 이 옵션들 뒤에 오는 값들을 각각 opt의 변수, opt.batch_size, opt.optimizer, opt.lr_decay_epochs 로 저장합니다. data type 을 정할 수 있으며, defaul 값을 미리 정할 수 있습니다. choices 의 값을 미리 정함으로써 정해진 값들 중 하나만 받을 수 있도록 할 수 있습니다.
다음을 터미널에서 실행해봅시다.
python run_2.py --batch_size 64 --lr_decay_epochs 30,50,80,100 --optimizer ADAM아래와 같은 결과를 확인할 수 있습니다.
Batch Size: 64
Optimizer: ADAM
Decay Epoch: [30, 50, 80, 100]
이제 터미널에서 학습 파라메터들을 받아서 파이썬 파일을 실행할 수 있게 되었습니다.
모형 성능의 모니터링
wandb 를 통해 학습 모형의 성능을 모니터링하고 비교합시다. 먼저 https://wandb.ai/ 에 가입을 하고 다음을 실행합니다.
# wandb 설치
pip install wandb
# wandb 로그인
wandb login
먼저 사용할 패키지를 불러옵니다.
# 패키지 로드
import torch
import torch.nn as nn
import torch.nn.functional as F
import torch.optim as optim
import torchvision
import torchvision.transforms as transforms
import wandb
wandb 프로젝트를 초기화합니다. wandb.init() 은 W&B Run으로 동기화하고 기록하는 백그라운드 프로세스를 생성합니다. 저는 project 이름을 CIFAR10 Classification으로 하였습니다.
# project 파라미터는 실험이 속할 프로젝트의 이름을 지정합니다.
wandb.init(project='CIFAR10 Classification')
https://wandb.ai/home 에서 My projects 를 확인해보면 CIFAR10 Classification 프로젝트가 생긴것을 확인할 수 있습니다. 저는 https://wandb.ai/jj-jeon/projects 에 프로젝트가 생겼습니다.

다음으로 프로젝트의 설정을 저장하겠습니다. wandb.config는 wandb 프로젝트의 설정을 저장하는 객체입니다. args 를 dict 으로 정의한 후 update(args)로 args에 포함된 키-값 쌍을 wandb.config에 추가하거나 업데이트하였습니다.
# Hyperparameters
batch_size = 128
learning_rate = 0.05
epochs = 50
args = {
    "learning_rate": learning_rate,
    "epochs": epochs,
    "batch_size": batch_size
}
wandb.config.update(args)
다음으로 'run'의 이름을 설정하겠습니다. 실행이란 주어진 프로젝트에서 wandb 프로세스가 우리가 설정하여 전달하는 정보를 처리하는 단위를 의미합니다. 우리는 모형학습 하면서 epoch 마다 결과값을 wandb 프로세스에 전달하는데, 이 정보를 기록하는 단위를 'run' 이라 부릅니다. 시뮬레이션 세팅 하나가 될 수도 있고 어떤 한 개의 seed 결과가 될 수도 있습니다. 첫번째 run 이니 이름을 'first wandb' 라고 하겠습니다.
# 실행 이름 설정
wandb.run.name = 'first wandb'
# 현재 실행의 상태를 저장합니다.
wandb.run.save()
다음으로 CIFAR-10 적합코드를 실행합니다.
# 데이터 로드/ 클래스 정의/ 모형 정의
transform = transforms.Compose(
    [transforms.ToTensor(),
    transforms.Normalize((0.5, 0.5, 0.5), (0.5, 0.5, 0.5))])

trainset = torchvision.datasets.CIFAR10(root='./data', train=True,
                                      download=True, transform=transform)
trainloader = torch.utils.data.DataLoader(trainset, batch_size=batch_size,
                                        shuffle=True, num_workers=2)

testset = torchvision.datasets.CIFAR10(root='./data', train=False,
                                     download=True, transform=transform)
testloader = torch.utils.data.DataLoader(testset, batch_size=batch_size,
                                       shuffle=False, num_workers=2)

# 2. Define a CNN
device = torch.device('cuda:0' if torch.cuda.is_available() else 'cpu')
print('device:', device)

class Net(nn.Module):
  def __init__(self):
      super().__init__()
      self.conv1 = nn.Conv2d(3, 6, 5)
      self.pool = nn.MaxPool2d(2, 2)
      self.conv2 = nn.Conv2d(6, 16, 5)
      self.fc1 = nn.Linear(16 * 5 * 5, 120)
      self.fc2 = nn.Linear(120, 84)
      self.fc3 = nn.Linear(84, 10)

  def forward(self, x):
      x = self.pool(F.relu(self.conv1(x)))
      x = self.pool(F.relu(self.conv2(x)))
      x = torch.flatten(x, 1) # flatten all dimensions except batch
      x = F.relu(self.fc1(x))
      x = F.relu(self.fc2(x))
      x = self.fc3(x)
      return x

net = Net().to(device)
wandb.log({"Training loss": running_loss / 20}) 는 dict 형태로 wandb 프로세스에 running_loss / 20을 전달할 수 있습니다.
# 3. Define a Loss Function and optimizer
criterion = nn.CrossEntropyLoss()
optimizer = optim.SGD(net.parameters(), lr=learning_rate, momentum=0.9)

# 4. Train the network
for epoch in range(epochs):  # loop over the dataset multiple times

  running_loss = 0.0
  for i, (inputs, labels) in enumerate(trainloader):
      inputs, labels = inputs.to(device), labels.to(device)

      # zero the parameter gradients
      optimizer.zero_grad()

      # forward + backward + optimize
      outputs = net(inputs)
      loss = criterion(outputs, labels)
      loss.backward()
      optimizer.step()

      # print statistics
      running_loss += loss.item()
      if i % 20 == 19:    # print every 20 mini-batches
          print(f'[{epoch + 1}, {i + 1:5d}] loss: {running_loss / 20:.3f}')
          wandb.log({"Training loss": running_loss / 20})
          running_loss = 0.0

print('Finished Training')
wandb.finish()

torch.save(net.state_dict(), 'cifar_weight.pth')
torch.save(net, 'cifar_net.pth')
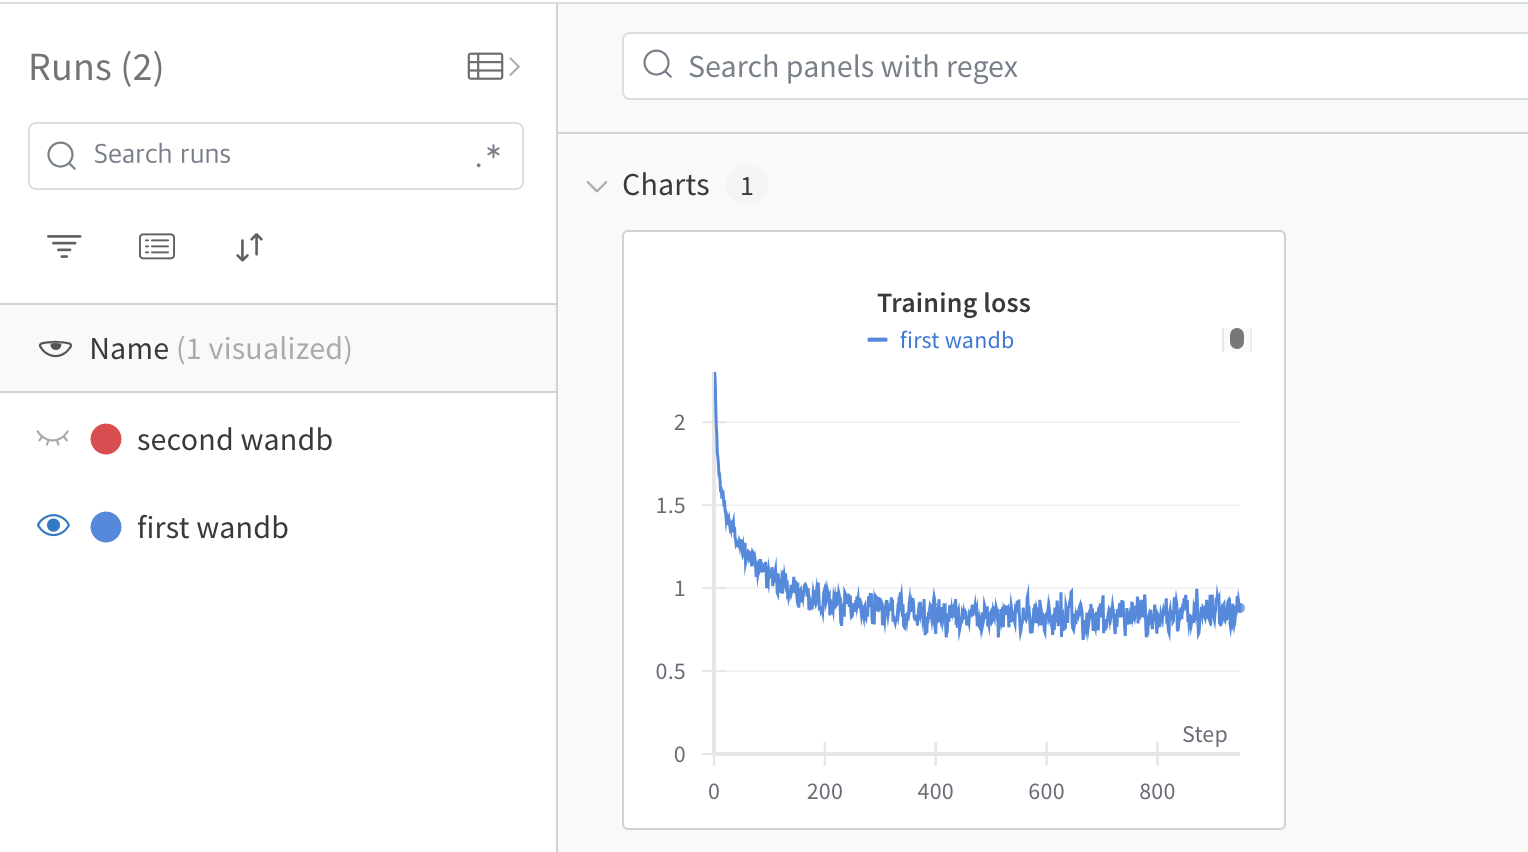
wandb 홈페이지 CIFAR10 Classification 프로젝트에서 실험결과를 확인할 수 있습니다.

wandb.finish() 를 통해 wandb 프로세스를 종료합니다. 마지막에 torch.save 는 각각 학습된 모형의 가중치를 저장하는 코드 입니다. cifar_weight.pth 에는 weight 가, cifar_net.pth 에는 학습된 모델이 저장되어 있습니다. 이 파일은 다음 장에서 사용할 것입니다.
run.name 을 second wandb 로 변경하고, learning_rate 를 0.01 로 수정합니다. 그 다음 터미널에서 실행해보겠습니다. 저는 이 코드를 wandb_run.py 로 저장했습니다.
python wandb_run.py
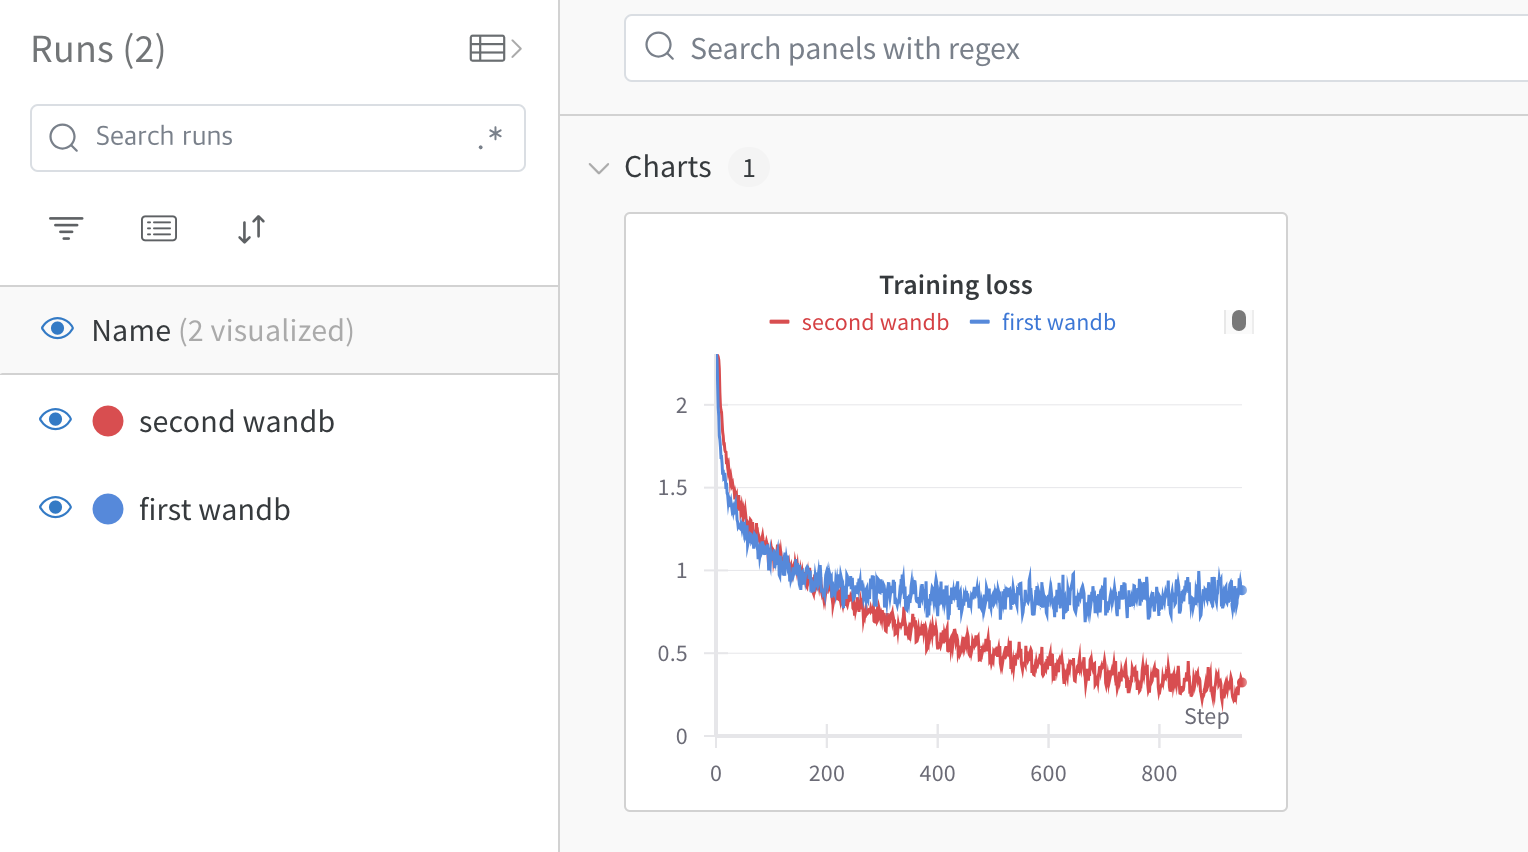
wandb 홈페이지 CIFAR10 Classification 프로젝트에서 실험결과를 다시 확인해보겠습니다.

마지막으로 커맨드 창에 argument 를 받아서 model parameter 를 조정하여 프로젝트를 만들고, 5번의 run 을 저장하는 코드를 짜 봅시다. 해답은 (여기로!)